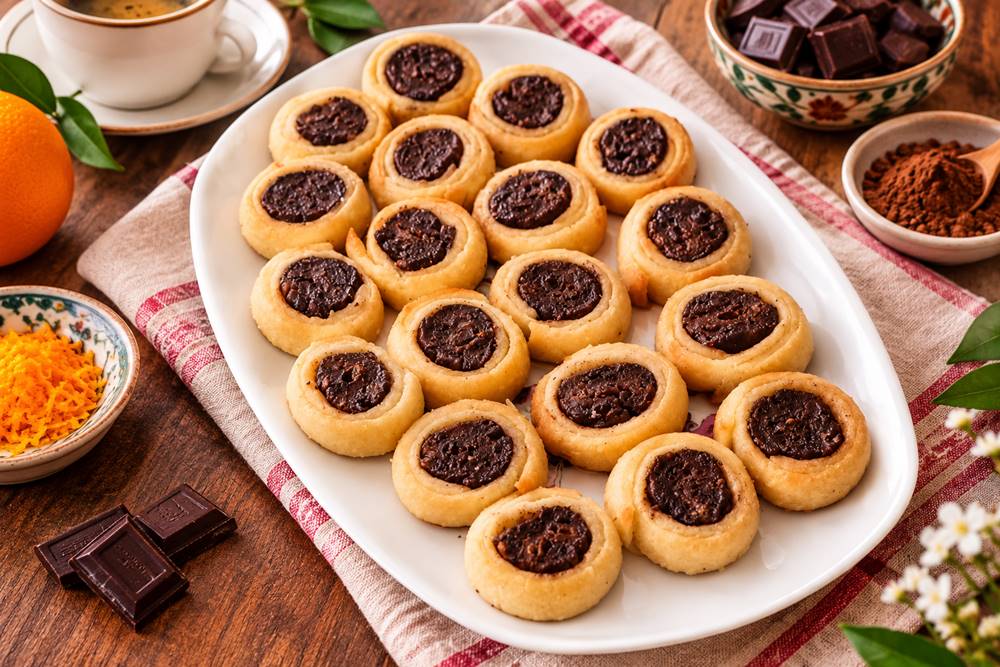
Some traditional Greek sweets are impossible to resist, and Roxakia are definitely among them!
These beautiful, two-tone pastries have a delicate cocoa center wrapped in soft, golden dough. Their wonderful flavor comes from a combination of chocolate, fresh orange zest, and sweet syrup.
I recently made a batch at home, and they turned out perfectly. But I discovered that patience is just as important as the ingredients.
The real secret? Wait 24 hours before serving!
Roxakia need time to absorb the syrup completely. By the following day, their texture becomes wonderfully moist, tender, and delicious.
What Are Greek Roxakia?
Roxakia are traditional Greek syrup-soaked pastries, especially familiar in northern Greek home baking.
Their distinctive appearance comes from two layers of dough: a light-colored outer layer and a cocoa-flavored center. When sliced, they reveal a beautiful chocolate swirl.
Unlike crunchy biscuits, Roxakia are meant to become soft and syrupy. They are often prepared for family gatherings, celebrations, and homemade sweet treats.
Traditional Greek Roxakia Recipe (Yield: Approximately 24–28 pieces)
Ingredients for the Dough
- 500 g self-raising flour
- 170 ml lukewarm milk
- 135 ml sunflower oil
- 1 large egg plus 1 egg yolk
- 5 g active dry yeast
- 3 tablespoons unsweetened cocoa powder
- Zest of 1 small orange
- A pinch of salt
For the Syrup
- 600 g granulated sugar
- 500 ml water
- 1½ tablespoons fresh lemon juice
How to Make Roxakia
- Activate the Yeast
Dissolve the yeast in the lukewarm milk. Leave for 5–10 minutes, following the yeast manufacturer’s instructions.
- Prepare the Dough
In a large bowl, lightly beat the egg and yolk with the sunflower oil.
Add the milk mixture, orange zest, and salt. Gradually incorporate the self-raising flour until a soft, pliable dough forms.
Avoid overworking the dough.
- Create the Chocolate Dough
Divide the dough into two portions: approximately two-thirds for the plain dough and one-third for the chocolate dough.
Knead the cocoa powder into the smaller portion until evenly combined. If it feels too firm, add a tablespoon of milk.
- Let the Dough Rise
Cover both portions and leave in a warm place for approximately 45 minutes, until noticeably puffed.
- Shape the Roxakia
Divide each dough portion into two equal pieces.
Roll the plain dough into two rectangular sheets.
Shape the chocolate dough into two long logs. Place each chocolate log along one edge of a plain sheet and roll tightly to enclose it.
Slice into rounds approximately 2–2.5 cm thick.
Arrange on a baking tray lined with parchment paper and leave to rest for another 15 minutes.
- Bake
Preheat the oven to 180°C (350°F), conventional setting.
Bake for 20–25 minutes, until lightly golden.
Allow the pastries to cool completely.
- Prepare the Syrup
Combine the sugar and water in a saucepan.
Bring to a boil, add the lemon juice, and simmer for approximately 5 minutes.
8. Soak the Roxakia
Gradually pour the hot syrup over the cooled pastries.
Turn them carefully to ensure both sides absorb the syrup evenly.
- Wait 24 Hours
This is my most important tip!
Cover the Roxakia and allow them to absorb the syrup for 24 hours, refrigerating them once cooled.
The following day, their texture will be beautifully tender and evenly syrup-soaked.
Tips for Perfect Roxakia
- Use self-raising flour and yeast.
This is the combination I used successfully. Because self-raising flour already contains raising agents, avoid excessive rising time. - Keep the dough soft.
Too much additional flour can make the pastries dense. - Roll tightly.
This helps create their characteristic two-tone appearance. - Combine cold pastries with hot syrup.
This allows the syrup to penetrate gradually. - Don’t rush the final step.
Although they may look ready earlier, I found that Roxakia taste their best after 24 hours.
What to Serve with Roxakia
Roxakia are delicious with Greek coffee, espresso, or a cup of black tea.
For a special occasion, I would pair them with a small glass of sweet Muscat wine from Samos.
Their cocoa and orange flavors make them particularly enjoyable during autumn and winter.
Nutritional Value
Roxakia are an energy-rich traditional dessert, providing carbohydrates from flour and sugar and fats from sunflower oil.
Estimated nutrition per piece, assuming 26 pieces and most syrup is absorbed:
Nutrient | Approximate amount
Calories | 235–250 kcal
Carbohydrates | 37–40 g
Fat | 8–9 g
Protein | 3 g
Enjoy them as an occasional sweet treat within a balanced diet.
Frequently Asked Questions
- Why do Roxakia need 24 hours?
The dough gradually absorbs the syrup, giving the pastries a softer, more evenly moist texture.
- Can I use self-raising flour with yeast?
Yes. This combination worked beautifully in my recipe. Just monitor the rising time, since the flour already contains raising agents.
- Can I make Roxakia ahead of time?
Absolutely! In fact, preparing them the day before serving gives them time to develop their ideal texture.
- How should I store Roxakia?
Keep them covered in the refrigerator and enjoy within 3–4 days. Allow them to come closer to room temperature before serving.
- Can I freeze them?
Yes. Freeze in an airtight container, preferably in individual portions, and thaw overnight in the refrigerator.
A Traditional Greek Sweet Worth Waiting For
For me, Roxakia are a reminder of how rewarding traditional homemade baking can be.
Their beautiful chocolate swirls, delicate orange aroma, and wonderfully syrupy texture make every bite special.
And if there is one thing I learned from making them, it is this:
Give your Roxakia 24 hours. The wait is absolutely worth it!
Every Greek recipe tells a story. Discover authentic flavors, traditions, and timeless family recipes with CookTheGreekWay.




Leave a Reply